DIY Lip Sugar Lip Scrub! Get Soft Lips Without Having To Leave Your Home!

Rough lips are a result of built up dead skin that is settled on your lips. There are many products on the market that assist with exfoliating lips but they contain harsh chemicals and are not always cost effective. Next time you need a decent lip exfoliation, head to the kitchen and grab these 3 simple ingredients to make a sweet and effective lip exfoliate.

DIY Sugar Lip Scrub:

– 4-5 Tbsp Granulated Sugar
– 1 Tbsp Olive Oil
– 2-3 drops Almond Extract

In a small bowl, mix olive oil, almond extract, and sugar until a thick paste forms (it should be spreadable, but not runny). If it is too dry add olive oil a drop at a time until it becomes spreadable, if it is too runny, add sugar to thicken mixture.

Application:
Using your index finger, apply sugar scrub on lips (I recommend rubbing with a decent amount of pressure for  about 30 seconds to assure all dead skin is removed). After scrubbing lips well, rinse with warm water and pat dry. You should be able to feel a significant difference within a single application.

Storage:
This scrub can be stored for up to a month in an air tight container. Cosmetic containers work great as well. You can purchase these in packs of 10 for $1.50-$3.00 on Ebay (here is a link to one seller, but there are hundreds online: Link), or you can look at your local dollar or beauty supply store.

Flavor Tips:
Almond Extract is what gives this scrub a great flavor! However, you can use any food grade extract to flavor your scrub. Try mixing extracts to create unique, one of a kind flavors. Also, you can use brown sugar and different oils to add other nourishing benefits to this scrub.

5 Simple DIY Backyard Idea’s That Will Bring Any Yard to Life This Summer!

Summer time is the season of backyard BBQ’s, celebration’s, and outdoor activities! Keeping up your outdoor space can be expensive, time consuming, and sometimes leave little to show for hours of work. These 5 simple DIY idea’s are great for adding a bit of spice to your backyard without spending tons of time and money!

1. DIY Votive Chandelier – Sunset Magazine

Blog 1Add a great evening ambiance to any outdoor space with this gorgeous DIY Votive Chandelier. To get step by step instructions on how to do this, please CLICK HERE to be directly linked to this fun project!


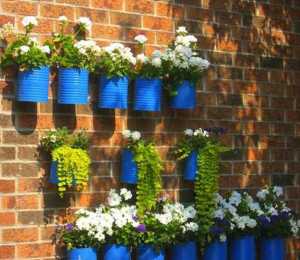
2. DIY Coffee Can Planters- Decor4all.com

Blog 1Take old coffee can’s (or any old aluminum can of choice) and spray paint with an outdoor (weather resistant) paint. Drill a hole at the bottom to allow for drainage. To learn more about this project, please CLICK HERE to be directly linked.


3. DIY Personal Fire Pit- Theartofdoingstuff.com

Blog 1This is a great idea for those who are renting or have limited outdoor space! This personal fire pit is surprisingly cheap, easy, and really adds a peaceful ambiance for those late evenings with friends and family. To get step by step instructions on this project, CLICK HERE to be directly linked.


4. DIY Large Modern Porch Swing- Ana White

Blog 1Now this project can seem intimidating to those just beginning DIY projects around the home, but it is not! Using mainly 2X4s and standard screw joints, this project can be completed in just a few hours by the beginner! To get complete instructions,including blueprints on how to do this project, please CLICK HERE to be directly linked to Ana White’s page.


5. DIY Outdoor Chandelier With Solar Lighting- Buzzfeed

Blog 1So I am a huge fan of using old chandeliers in my outdoor decor. I usually let them hang freely most times due to limitations when it comes to wiring. This awesome DIY idea from Buzzfeed.com incorporates solar lights to add a dimmed overhead lighting ambiance for any outdoor space. To get learn how to do this awesome project, CLICK HERE to be directly linked to the Buzzfeed article.

5 Great DIY 4th of July Home Decor Idea’s

Getting the home ready for those 4th of July BBQ’s is not always as easy or as cost efficient as we would like it to be. Luckily, I have found these 5 simple DIY idea’s that are cheap, easy, and will look wonderful for all of your 4th of July celebrations

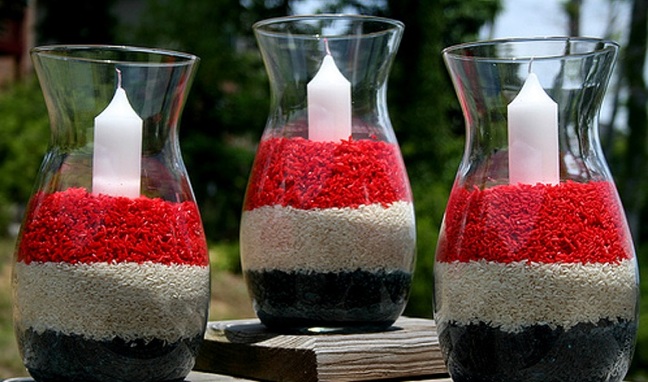
1. Red, White, and Blue Candle Hurricanes- BLovelyEvents.com
Blog 1

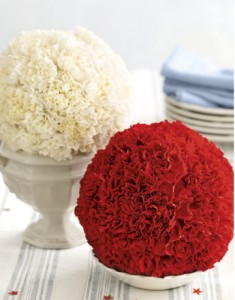
2. Carnation Balls- Countryliving.com
Blog 1

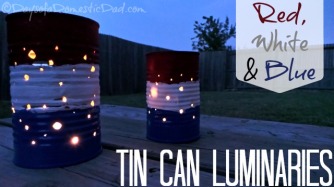
3. Red, White, and Blue Can Luminaries- daysofadomesticdad.com
Blog 1

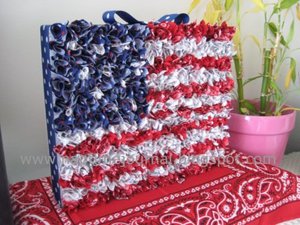
4. Grand Old Flag- favecrafts.com
Blog 1

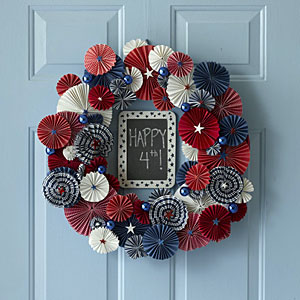
5. 4th of July Wreath- AllYou.com
Blog 1

 Like this post? Comment Below! Have an idea for a DIY 4th of July Project? Post it in the comments below and you may be featured in a future post!

5 Cute, Fun, and Easy 4th of July Nail Ideas!

Need some cute and fun idea’s for getting your nails all spiced up for the 4th of July? Here are 5 cute, fun, and easy Idea’s with links on how to do each design to get you inspired and ready to look great!

  1. American Flag Nail Art- Totallyloveit.com
    Blog 1

  2. Go Gradient, Get Bold, Get Striped! – HelloMaphie Youtube
    Blog 1

  3. Stripe Down- ThisThatBeauty
    Blog 1
  4. Say It With A Bang! – The Huffington Post
    Blog 1
  5. Red, White, and Blue For The Hipster In You – Brit.Co
    Blog 1

We want to hear from you! Comment Below and Share Your Idea’s For a Chance To Be Featured In a Future Post!

5 Fun 4th of July Activities to Do With Kids!

The 4th of July is a fun time for family and friends to get together and enjoy a day of BBQ, Parades, and Fireworks! Get little ones involved with your 4th of July celebration this year with these 5 fun kid friendly activities!

  1. Balloon Fireworks!
    Blog 1Kids love fireworks, but parents know how dangerous they can be! An idea I obtained from MarthaStewart.com is fun alternative to the real deal that requires only seconds to make!Balloon Fireworks are filled with confetti and popped using a sharpened pencil (marthastewart.com advises parental supervision for children under the age of 8).

    To see the full article and instructions on how to do this, please CLICK HERE to be directly linked to marthastewart.com

    **Fun add on idea’s:
    -LED Balloons can be used to give your balloon fireworks a glowing effect before it pops!
    -Glitter or angel dust can give a more sparkling effect especially in bright light (I would advise to have them pop it in an area where you can easily clean up mess such as outside or over a mat)

  2. 50 Stars and 13 Stripes American Flag Cake!
    Blog 1This American flag cake has 50 refreshing blueberry stars, and 13 juicy raspberry and powdered sugar stripes! Found on Smitten Kitchen’s Blog, this cake is not only fun to make but delicious to eat! Cut down time, and make it more kid friendly by using boxed cake mix such as funfetti.

    To get the full instructions on how to make this, CLICK HERE to be directly linked to Smitten Kitchen’s Blog.

    **Make this cake significantly less in calories without sacrificing taste by using angel food cake and whipping cream frosting.

  3. DIY Patriotic Pinwheel
    PinwheelWe all remember the hometown parades on 4th of July morning where kids would hold cute little flags or pinwheels as they watched floats throwing candy pass them by! This fun DIY patriotic pinwheel is from firstpalette.com and is a fun activity for you and your children that will make them proud to hold during your 4th of July celebrations!

    To get full instructions on this fun DIY project please CLICK HERE to be linked directly to firstpalette.com.

    **Fun Tip!! ** -Use clear glitter paint for a day time sparkle effect, and glow-in-the-dark paint for a fun night time glow!

  4. Red and Blue Water gun Tie Dye!!
    Blog 1What kid does not love to get messy! With outside BBQ’s and family gathering’s This is a perfect activity for kids and they can make a cool Tee!

    I found this on postgradlife.tumblr.com! I would recommend this for older children, but with adult supervision, this could be a fun activity for the whole family!!! Using white tee shirts, with red and blue dye, they can create a fun patriotic shirt while battling out their friends!

    To get the full instructions on how to do this, please CLICK HERE to be directly linked to postgradlife.tumblr.com.

  5. DIY Ring Toss
    Blog 1I found this fun idea on HGTV.com and thought it was a great way to replicate a classic childhood game! Using common household items like old soda or clear beer bottles and rope this ring toss game is sure to provide your kids and your friends with hours of fun outdoor entertainment!

    For instructions on this fun game, please CLICK HERE to be directly linked to HGTV.com.


Let us know what you think!!! If you liked these idea’s, have comments, questions, or would like to see a few of your own featured in future blogs, let us know in the comments below! 

5 Kitchen Hacks Using Household Items That Will Blow Your Mind And Save You Time!

Stop wasting time and money on pointless gadgets that really don’t make life in the kitchen easy! These 5 kitchen hacks used items you have laying around in your home and work better than most commercial products!!

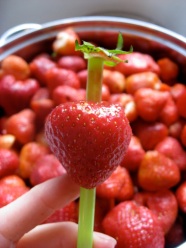
  1.  Pit a Strawberry With a Straw:
    1 of 20 Kitchen Hacks; How to pit a strawberry with a straw
    1 of 5 Kitchen Hacks; How to pit a strawberry with a straw. (Courtesy of  New Nostaliga’s blog. Click image for direct link)

    I first heard about this hack from New Nostalgia’s blog and it is one of the best ways to pit strawberries for fruit salads, stuffed berries, or any recipe that calls for pitted strawberries!

    To do this hack, simply grab a straw (non-flexible straws do work best) and insert the straw into the bottom of the strawberry and push all the way through (as pictured to the left; if using a flexible straw, use the non-flexible end). This will give you a perfect pit every time!

    *Note: a single straw can pit 4-5 berries from my experience flawlessly!

    To learn more about this hack, CLICK HERE to be directly linked New Nostaliga’s Blog.


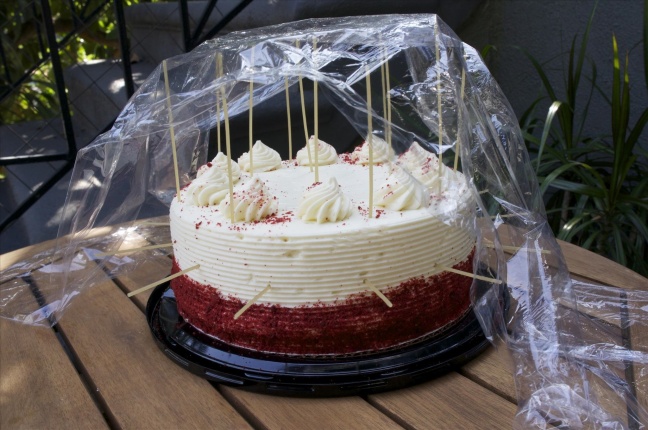
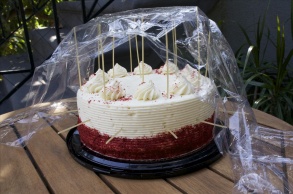
  2. Use Spaghetti to Keep Frosted Cakes Looking Great!
    2-20 Kitchen Hacks! Use Spaghetti to Keep Frosted Cakes Looking Great!
    2 of 5 Kitchen Hacks; Use Spaghetti to Keep Frosted Cakes Looking Great! (Courtesy of Food Hacks blog on Wonderhowto.com. Click image for direct link)

    This hack is one of the greatest hacks I have seen in a while! No matter your baking skills, every baker can tell tales of spending hours to decorate the perfect cake, to just have it smudged on the 5-10 minute drive to your party/event! This hack is from Food Hacks on Wonderhowto.com and is a great way to keep your cake looking great simply using dried Spaghetti and plastic wrap!

    To do this, simply insert dried spaghetti, equally spaced apart, around the sides and top of your cake. Cut two LONG sheets of plastic wrap and drape them over the cake perpendicular to each other and wrap the ends on the bottom of the cake.

    To see a visual step by step process of this, please CLICK HERE to be directly linked to Food Hacks on Wonderhowto.com

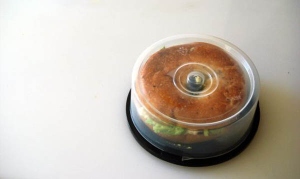
  3. Old CD Holders for Bagel Storage!
    3-20 Kitchen Hacks- Old CD Holders for Bagel Storage!
    3 of 5 Kitchen Hacks; Old CD Holders for Bagel Storage! (Courtesy of Twisted Sifter- Click image for direct link)

    So for many of us today, old CD Holders are simply taking up space in our offices. Upcycle these great plastic containers to store bagels or transport bagel sandwiches! I saw this on Twisted Sifter’s Blog and could not resist! Don’t forget to wash well with hot water!!! (No one wants a dusty bagel lol)
    To see the full article CLICK HERE to be directly linked to Twisted Sifter’s Blog

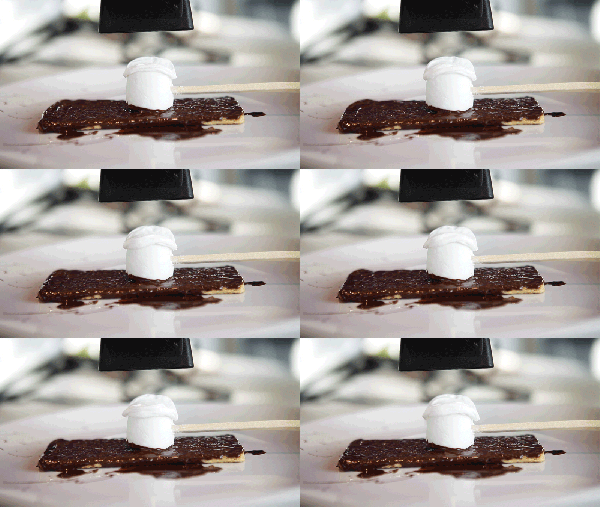
  4. Use a Hair Dryer to Make the Perfect S’mores:
    4 of 20 Kitchen Hacks; Use a Hair Dryer to Make the Perfect S'mores
    4 of 5 Kitchen Hacks; Use a Hair Dryer to Make the Perfect S’mores (Courtesy of The Salt- Click Image to be Linked)

    There are times when we want those great campfire treats, but no campfire available! Bust out your hair dryer, because you can get S’mores anytime at home with this great kitchen hack found on The Salt’s Blog!

    Simply place your hair dryer on High and place directly above a graham cracker layered with a milk chocolate and a marshmallow. Within seconds, the chocolate will become glossy and begin to melt with the Marshmallow.

    *Note: A chopstick or butter knife is helpful to hold the solid chocolate down when you begin this process. (The air from the hair dryer causes it to blow around).

    To learn more about this hack, or other cooking with hair dryer hacks, CLICK HERE to be directly linked to The Salt’s Blog!

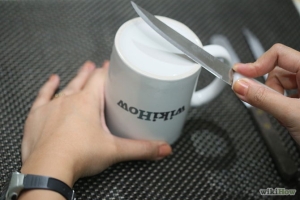
  5. Sharpen Dull Knives With A Coffee Mug!
    5 of 5 Kitchen Hacks; Sharpen Dull Knives With a Coffee Mug (Image Courtesy of Wiki How, Click Image to Be Linked)

    Okay so as a college student, I don’t have much money to get decent knives, let alone buy a fancy knife sharpener or pay someone to do it for me! I have taught all my roommates this trick and it has saved us tuns of money!

    Simply turn a coffee mug over and place the bottom of your knife, at a 45 degree angle, sharp end facing away from you (as pictured to the left) and stroke down. Repeat this process a few times on both edges to get a good sharp blade.

    “Wiki How” has a great visual step-by-step process on how to do this, please CLICK HERE to be directly linked.

    *Please Note, YOU MUST BE CAREFUL TO NOT CUT YOURSELF WHILE DOING THIS! We take no responsibility for the injury of one while conducting this hack! You are assuming on all risk on yourself.

Want To Know A Hack For You Kitchen Needs! Have A Hack To Share? Comment Below And We May Feature Your Hack/Hack Need In Future Blogs!!